Journal
How I moved my Astro website from GitHub Pages to Codeberg Pages

You probably won’t notice any difference, but behind the scenes, my website moved from GitHub to Codeberg Pages a few weeks ago! Coming from GitHub, which hides a lot of complexity and provides many features out of the box, I didn’t find the migration particularly straightforward. So I decided to share a tutorial that I hope will be useful to others who are also considering moving their website to Codeberg.
What is Codeberg?
Codeberg, founded in 2018, is an open-source, non-profit alternative to GitHub, operated by a member-owned association based in Berlin, with its servers also hosted there. While GitHub also hosts many open-source projects, Codeberg is explicitly dedicated to non-profit and free and open source software. In terms of size, Codeberg is not negligible, with around 200k users and 300k repositories as of November 2025, but it is of course small compared to the commercial giant GitHub, with 225 million users and 800 million repositories. Besides hosting code, Codeberg also provides hosting for static websites, just like GitHub, which is what I’ll be covering in the following.
Techstack of my website
My website uses the static site generator (SSG) Astro, with a base template called Dasein, which I tweaked here and there according to my needs. If you are not familiar with the term, a static site generator basically builds the files for your website for you and helps you separate your content from your templates, so you can simply add content in Markdown without having to write HTML files for every new page you add. Astro has quite extensive and beginner-friendly documentation, in case you want to give it a try.
Until now, I have been hosting my website on GitHub pages. I have hosted several websites there before, using plain HTML, CSS and JS or Jekyll, a different SSG. Hosting on Github is very beginner-friendly, since there is a native Actions runner (I will get into this later), and because it is a common hosting service for SSGs, there is usually detailed documentation for hosting on GitHub with whichever SSG you are using.
Here is the repository with the code of my website.
Refresher: Hosting an Astro website on GitHub Pages
I will quickly explain the process of hosting Astro on GitHub pages, so it will be easier afterwards to explain what is different on Codeberg pages and what made me run into some difficulties before managing to complete the migration.
To begin with, you push your website code to your remote repository on GitHub. This triggers a GitHub Action, a tool that can automatically run CI/CD (continuous integration and continuous deployment) tasks. In the case of an SSG, the Action builds the website from the files in the repository and deploys it on GitHub Pages. To achieve this, you have to add a YAML workflow file that specifies which steps to take for the specific SSG you are using. For Astro, this is very simple, since they provide a prewritten file that you can simply add to your repository.
By default, GitHub hosts the website at a URL in the format https://{username}.github.io/ or https://{username}.github.io/{repository-name}/. To use a custom URL, you have to buy a domain from a domain name provider, add it to the settings of your repository, and configure the DNS settings on the domain provider’s side accordingly. You might need to correct some internal links in your website’s files in case they broke, and then you’re good to go.
Hosting an Astro website on Codeberg Pages
In principle, hosting a website on Codeberg Pages works in exactly the same way. However, since I had always used the convenient GitHub solution, which provides Actions out of the box, and SSGs that provide prewritten files, I had to learn some new things in order to make it work. So here is the step-by-step tutorial, hoping it might be useful in case you are in the same situation.
The two first difficulties I ran into were:
- The Astro documentation does not provide a prewritten YAML file for building and deploying an Astro site to Codeberg. So I could not just copy and paste one, but had to understand how to write one myself.
- Codeberg repositories don’t have an “Actions” tab like GitHub does, where the repository’s actions just magically appear and run. So I had to figure out how to actually run that YAML file.
Running the YAML file
I will first go into the second problem. How do I run an action file if it is not automatically recognized and run in the magic GitHub Actions tab?
The Codeberg pages homepage recommends using a CI in case you’re using a SSG, which was true in my case. A CI/CD system automatically runs build and deployment steps, so you don’t have to run these steps manually every time the repository is updated.
Codeberg recommends using a pre-made Forgejo Action that needs to be configured depending on the URL you are using. However, as of now, they do not provide larger scale hosting for these Actions because of resource constraints, and ask users to self-host them or to use Woodpecker CI. I did not want to self-host, so I went for the second option. Codeberg has an instance of Woodpecker at ci.codeberg.org, a CI/CD tool that runs Actions, which can then be used for deploying websites.
I first needed to request access by providing some details about my project using this form, since Codeberg checks requests case-by-case for legitimate use. After less than one day my request was accepted, and I could activate my Woodpecker account and connect it with my Codeberg account.
I added my Pages repository to Woodpecker using their interface:
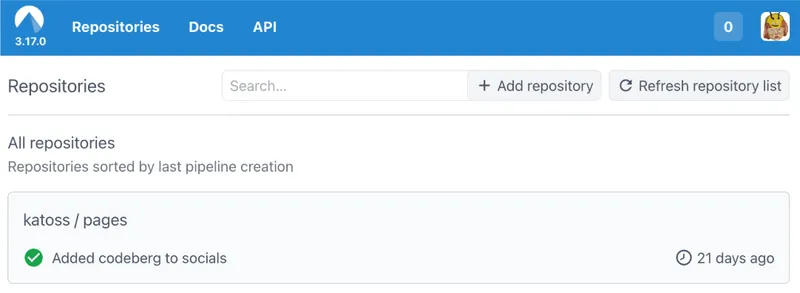
Then, on Codeberg, I created a token, which I then added as a secret in Woodpecker. For configuring the secret, I did the following:
- First, on Codeberg, I went into the settings of my profile (click on the avatar in the top right of the page, and then on Settings)
- In the Applications tab, click “New access token”. Name it however you want (I called it “Woodpecker pages deployment”)
- Give the token access to the repository needed (katoss/pages)
- Permissions: repository (read and write), user (read)
- Go to the repository settings in Woodpecker —> Secrets —> Add secret
- The name has to be the same as used in the YAML file (FORGEJO_ACTION_TOKEN in my case)
- As the value I pasted the token copied from Codeberg
- I left the “plugin image” field empty
- And I made the secret available for the following events: Push and Manual. That means that this secret can be used for pushes to the Codeberg repository or when triggered manually.
And that was it, my repository was now ready to run Actions via Woodpecker.
Update: Alternatives for running the yaml file
-
It is also possible to use the git pages woodpecker plugin, which spares you from configuring your own Woodpecker pipeline. To use it, you need to add the image of the plugin to your yaml file (see the deploy step in this file as an example). I tried to use it first, but it did not contain the
-–server codeberg.pageparameter, so I did not manage to configure my custom domain. This is fixed now. Thanks to user gedankenstuecke for sharing und fixing the issue! -
Using hosted Forgejo Actions also seems to be more accessible than I originally thought. They can be configured directly in the repository setting (see this tutorial). Thanks to @zoef for pointing this out!
Writing the YAML file
Now, onto the YAML file itself.
I created a file called .woodpecker.yaml in the root directory of my repository.
This YAML file specifies the pipeline to run when deploying the website, aswell as when to trigger that pipeline.
First, my YAML file explicitly clones the Git plugin of the woodpecker CI:
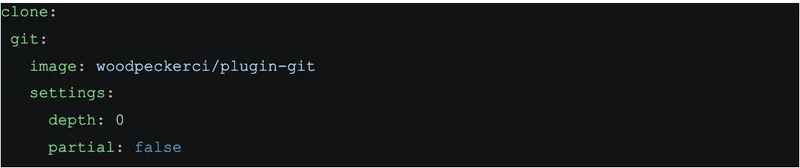
This is apparently not strictly necessary because Woodpecker automatically adds a Git clone step. However, I repeatedly ran into errors related to the automatic clone step, and adding it here explicitly (cloning the whole repository instead of doing a partial clone, which seems to be the default) solved my issue.
Second, I tell the YAML file when it should run, namely when I push changes to the repository or when I trigger the workflow manually.

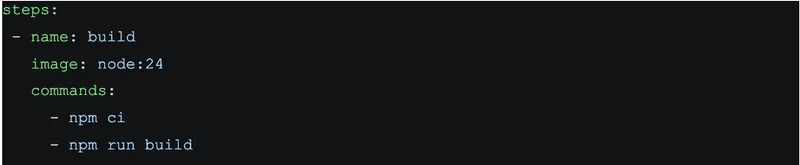
Third, the heart of the file: the steps of the CI/CD pipeline, namely building and deploying the website. To build my Astro website, which is necessary when using an SSG, Astro needs a Node container in which I let the action execute the commands ci (clean install my dependencies) and run build (building the Astro site into dist/).
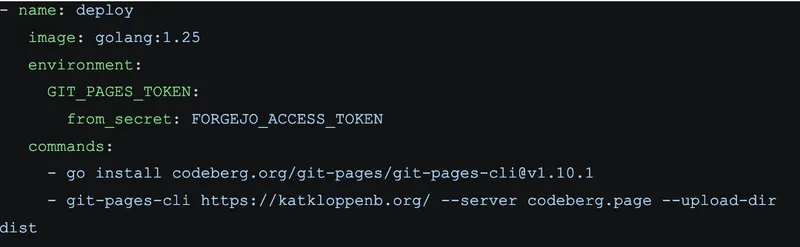
Next is the deployment to Codeberg, using my custom domain katkloppenb.org. This needs a Go container and uses the previously created Woodpecker secret to make it available as a Git Pages token. We then install the git-pages-cli inside the Go container and execute it by telling it to publish to my custom domain, connect it to the git.pages server at codeberg.page, and upload the contents of the dist/ directory, which contains the website files.
The -–server codeberg.page step is important because there is a circular dependency for the first commit without which HTTPS does not work. It is mentioned here in the documentation, but it took me a while to figure that out!
Configuring the custom domain with the DNS provider
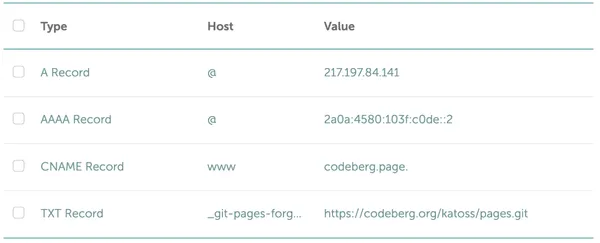
In order to make a custom domain work, you need to configure the connection to Codeberg on the website of your domain name provider. This is also necessary when using GitHub Pages. For Codeberg, I set A, AAAA, CNAME and TXT records that are listed in the documentation.
Configuring the Astro config file
It is also necessary to change the Astro config file (astro.config.mjs) to the custom domain.

And that’s it!
Next steps
While having a tutorial on my personal website is nice, it will probably not reach the people who might need it very effectively. So, a next step for me will be to see if I can update the official documentation with the lessons I learned.